Quantcast
Channel: The Velo ORANGE Blog
Viewing all 677 articles
Browse latest View live

The VO Site Will Be Down for 48 hours

$
0
0
The VO web store will be undergoing maintenance for about 48 hours. We'll grease everything, replace some the bearings, run new cables, and more.

It'll be shut down tonight at around 5pm ET and be back up again late on the 9th, so if you need anything shipped right away please order in the next few hours. We won't even be able to sell stuff in the showroom since the whole sales system will be down.

That is all; carry on.

Website is Back Up and Restocked!

Velo Orange has Been Sold

$
0
0
By Chris

Note: This post is cross-posted on Chris's Blog
I wanted to announce that I've just sold Velo Orange.

The new owners, Adrian and Igor, are longtime employees. Rest assured that the company is in good hands. In fact, except for myself and Annette, the staff remains intact.

I also wanted to share some of my reasons for selling VO:

One of the main reasons I'm selling is that I had this little epiphany when I was diagnosed with cancer a couple of years ago. I underwent surgery, chemo, and radiation.  (There is no sign of the cancer returning and the odds are that it won't. But there's still a fair chance that it could.) That experience brought home something I already knew. I no longer want be a businessman; it's time for new adventures.

Velo Orange has always been and remains a very successful and profitable enterprise. It's a company that I'm proud of. It's also a company that I enjoyed building and growing, very much so. I also enjoyed hanging with the VO staff, who are the best group of folks I've ever worked with. But running a company, I didn't enjoy that so much.

I'm also selling because I like being retired. I know this because I first retired when I was 41 years old, after starting and selling Chesapeake Light Craft. I launched VO six years later. The plan was for a little part time gig based on importing a few odd bike bits from Europe and Japan. It was my retirement hobby, one that I hoped might turn a small profit. Such are the best laid plans... Anyway I've just turned 59 and now I really am retired. Really. Though I do have this one idea...

Our plans include lots of travel (I'm building out a camper van), fly fishing, catching up on a lot of reading, visiting friends all over the country, and maybe getting involved in local politics. I'll write more about this, and about business and the bike industry later on my personal blog, should anyone care. You can also follow me on Instagram and on Twitter.

Enough rambling; thanks for your support over the years and for making VO what it is. And best of luck to Adrian and Igor.


A Big Hello From Igor and Adrian

$
0
0
by Igor and Adrian
Being part of the Velo Orange team for a combined 10 years has always been an amazing and rewarding experience. We get to work with fantastic people and design and produce bicycle products that we sincerely enjoy. As we step into our new roles as owners, we’d like to share a bit of what we hope to accomplish.

But first, we wanted to give all of our readers and customers a huge thank you. You guys and gals drive our passion to create, develop, and launch products that have a foot in both worlds of yester-year and today. Thank you.

Aside from losing Chris and Annette, who will be sorely missed, all staff will remain. So expect to get the same exemplary customer service out of Velo Orange, with timely shipping and familiar ordering.

From a product standpoint, development within our niche is exciting. Sometimes it’s a classic concept that has been lost to obscura, and other times we come up with an idea that is totally unique. Either way, we will strive to keep you updated through our various social media avenues. Be warned, we do enjoy teasing drawings and prototype photos. And as always, safety and function is paramount to us, so we will ensure that every single product VO offers will be tested to the appropriate standards for its intended use both in the lab and on the bike.

Content generation is the lifeblood of any successful business, so expect more tour reports, show and expo participation, and general cycling musings. Cycling is our passion. Adrian and I, and the VO gang, have long resumes of cycling: traditional touring, randonneuring, bikepacking, cyclo-crossing, road racing, fixed gear-ing, and mountain biking - we’d like to share more of these stories with you.

We are excited to continue VO’s direction of quality, affordable, reliable products with vintage flair for cyclo-tourists, commuters, and city riders. It is what VO was built on. If you have a good chunk of time free, please explore the blog from 2006 onward. There is a lot of valuable insight, interesting bike parts, and great discussions from VO’s early years.

Feel free to reach out to us anytime: igor(at)velo-orange.com and adrian(at)velo-orange.com

Thanks and happy riding!

Trekking Bars - The Original Alt Bar

$
0
0
By Scott

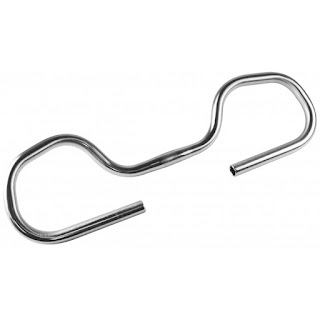
It's hard to believe that it has been 3 years since we launched Casey's Crazy Bar. In a world of drop bars and flat bars, the Crazy Bar was polarizing. But, we'd be remiss if we didn't dig back further into the realm of alternative bars to an original one - the Daija Trekking Bar.

I remember seeing these bars on bikes ridden by an older Austrian couple in New Zealand back in 2001. The bars fitted well with the front and rear panniers, rack top bags and trailer they were each pulling around the south island of New Zealand.
Compared to flat bars, trekking bars offer more hand positions. You can use the sides to rock up a hill, you can stretch out forwards in a headwind, or keep your hands close to the brakes and shifters.


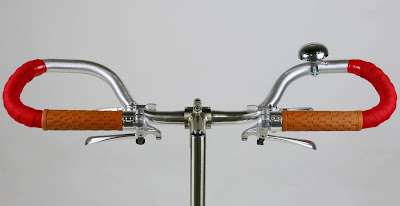
In terms of set up, there seem to be two camps. You either have the open end of the bars face towards you or away from you. A search of photos on the net shows more people run them with the opening towards the rider, thus keeping the brake levers and shifters close to you. Go ahead, do the Google search, we can wait.

OK, so now that you have seen the myriad of cockpits out there, you can see how this bar is the ultimate in individualizing a handle bar. I've never seen flat bars or drop bars get built up with such a personalized feeling about them. In the photo above, we put tape along the sides, but you could easily use another set of grips there as well for more cushioning.

For those of you who are now intrigued by these, some basic spec's - the clamp area is a 25.4 mm, standard for flat bars. The straight section where your main grips, shifters and brake levers would fit is a 22.2 mm clamp area and is 15 cm long. They work best with a 25.4 mm threadless stem, as trying to get a quill stem around all those curves could prove to be a nightmare. If you had a quill stem with a removeable faceplate, that would work as well (wink, wink, nudge, nudge).
( Photo taken by Endlessvelolove )

So how many folks out there are fans of alt bars and how many just want a flat bar with a bit of curve/bend to it?

Differences Between Brake and Shifter Housing & Tie-Dye Sneak Peek!

$
0
0
by Igor
We've had quite a few calls recently about the difference between shift and brake housing. It's probably because it's the time of year when people are swapping their winter bikes for their Spring/Summer/Fall steeds or overhauling their year-round'ers. Amongst all of the tasks to do during an overhaul, one of the key parts is changing out your cables and housing so your shifting and braking is crisp and friction free for optimal performance and safety. From the outside, brake and shift housing looks similar, but the differences are important.

Brake housing consists of an inner liner, spirally wound stainless steel wire, and an outer plastic sheath. This design makes for good, consistent braking performance. Shift housing, similar to brake housing, uses steel surrounding an inner liner, and then coated in plastic to impede moisture infiltration.
But notice the difference! Shift housing uses strands that run the entire length of housing rather than spiraling. This is known as "compressionless" shift housing. This design was mainly brought about for indexed shifting, where precision was important, otherwise you would get stuck between gears.

You don't want to use shift housing for brake housing as it simply isn't designed to take the amount of force that a brake levers requires. Your housing will split and you'll have a bad time. You can use brake housing with friction shifting, but why would you when there is a better option?
We do offer this retro stainless steel shift and brake housing. Mind you, the shift housing is only compatible with friction shifting for the aforementioned reasons. On vintage, steel racing bikes this housing looks so good.

A few tips if you're installing cables and housing for the first time:
  • Your housing should have gradual, natural bends. If it's too long, you'll introduce more friction than necessary. And if it's too short, you'll have poor performance and potentially limit the range of handlebar movement.
  • Use a file on the housing end to get rid of burrs prior to using ferrules to ensure proper, flush interface.
  • Modern cables don't stretch like older cables did. Today, they come pre-stretched from the factory. Any slop you experience soon after installation is most likely the ferrules settling onto the end of the housing by getting pressed against your cable stops. Release the cable from the pinch bolt, pull a bit more cable, and re-adjust.
  • When you cut housing, the inner liner might close up. Use a dental pick, wooden tooth pick, or your trusty "Pokey-Spoke®" (a spoke that has been sharpened to a point) to open it back up.

Totally unrelated, yesterday was a balmy 70°F, so we tied-dyed. We'll post photos next week once everything dries.

Tie-dye Fri-dye!

$
0
0
by Clint
Ready for warm weather
We have an office tradition of wearing tie-dye on Fridays.  Tie-dye Fri-dye.  I may or may not be the only participant.  Anyways, I was looking at our white bar tape the other day and thought a little tie-dye would be a great way to spice it up.
Gettin' in the nooks & crannies
It's easy enough to do.  You just need a tie-dye kit and white cotton bar tape.  I like our tape for this application.  It's nice and thick so it'll soak up plenty of dye.

I experimented with a few different folds for the tape.  I don't think these ended up making much of a difference.  It's easy enough to wrap a few rubber bands around it right out of the box and get to the dying.  When you've got it all wrapped up, I'd recommend soaking it in water before you dye.  This will help the dyes absorb into the fabric.
Dye patterns: Stripes & top and bottom dip
Time to dye!  I tried a couple different dye application methods.  Stripes along the rubber bands and soaking the top and bottom of the coil.  Both worked pretty well.  You really need to get in the cracks of the tape to make sure it all gets color.  Unless you want some white.  That's a pretty cool effect too.

Here's the tape on a couple bikes!  I think it turned out pretty darn well.  Just in time for the unseasonably warm weather we're having!

Tie-dye klunker

Shout out to Alison for the corks!

Dreamy bar wrap
We had some leftover dye from the bar tape so we tied an dyed a few shirts, shoes, and caps!  Great participation in tie-dye Friday today!
Tie-Dye crew.

Little Bit of This and That

$
0
0
by Igor

I'll keep it short and sweet.
We're putting Microfiber Touring Saddles in regular and wide widths with dinged or crooked badges on sale. We've moved to doing a screenprinted VeloORANGE logo because we think they look better and are safer during transport.
We're working on a new design for our VO skewers to make them more disc brake friendly (they currently flip open more than 180 degrees), so our current ones are on sale. They're perfectly fine for disc and rim brake applications granted you have brushed up on Quick Release 101.
Thanks so much for your patience with the Cigne Stems being out of stock. They take a long time to make and the last production run sold through way faster than we expected - sometimes that happens when you test the waters with a new product. We're getting lots more in early-April.
More Mojave Cages are arriving next week. When you sign up for a product alert, you get an automated email telling you a product is in stock.
Using bikepacking equipment means you probably have braze-ons that go unused. These nifty plastic screws plug your frame and fork's holes to deter moisture and debris from entering your tubes.

That is all. Have a great day!

The VO Archives

$
0
0
By Scott


As a history major and someone who volunteered at the Air and Space Museum's archives department while waiting for a green card, I'm a sucker for old information. I'm also the person here at VO that answers most of the questions via email and phones, so I have a handle on the kind of questions that we get on a regular basis.  Now that VO is at a point where we have been around for over 10 years (last year was our 10 year anniversary, we'll still take congratulations cards), we have products that were made for a few years and then for a variety of reasons, dropped from our line up. So we have created a new resource for the discontinued frames - an archived frame section. We're basically putting up the same descriptions that we had when we sold the frames. So if you have a Rando frame and you don't recall how big a tire fits it, you can look it up there.

We also have the older frame specs in the tech pages. So if you want to compare head tube angles and such for a bike you saw on ebay, this is the place to go.
We're proud of our line up of bikes. Certainly times have changed. Back when the Rando was in production in 2010, 32 mm tires were considered wide by most folks. Now on builds of the Campeur and Disc Pass Hunter, 32 mm seems to be where most customers start. Yet looking at the frames we have made, you can see a consistent lineage of designs made to take fenders, racks and look timeless.

Taiwan Trip and New Fairweather XC Tires

$
0
0
by Igor

Next week, Clint and I are traveling to Taiwan to attend the Taipei International Cycle Show. We'll meet with our suppliers to discuss frame designs, new cockpit offerings, fenders, rims, and a multitude of other parts and accessories.
In between meetings, we'll ride bikes and eat lots and lots of street food.

I'm taking my trusty Campeur: 20 speed'd, fender'd, front rack'd, and dynamo lighting'd. Clint is taking a much more minimal approach to his travel bike: a single speed Surly Traveller's Check with front rack for lots of 7-11 sushi triangles. Expect lots of photos on Instagram, and don't forget to check out our Stories, too!

We'll have a full report with status updates and even some teasers when we return. If you have any ideas or products you'd like to see, email us: ideas@velo-orange.com
We just got in these fast-rolling and extra supple XC tires by our friends over at Fairweather and Panaracer in Japan. These tires are a great fit for your no-road touring or MTB. Though they are designed for mounting with a tube, Clint is going to try out running them tubeless on his hardtail. They're available in 26x2.1" and 29x2.25".
Lastly, we just got in a shipment of Mojave Cages and Fairweather Shred Bars.

Vintage Bikes and Vintage Watches

$
0
0
By Scott

It's interesting how worlds that seem very apart can actually run in parallel. This week, the Taiwan Bike Show is on. Igor and Clint have headed over there to see the show, talk to our suppliers and see what is new with the industry and how it might help us offer better, more interesting products to you. On the other side of the world, Baselworld is happening in, yep, Basel Switzerland. This is one of the big watch shows of the world. Everyone from Rolex down to folks who make the straps and buckles for watches go to this show. Similar to how Shimano and SRAM are at TBS as well as the small companies that make nuts and bolts for cranks and brakes.

I've been getting into watches in the last year. I partially blame a good friend of mine who collects older mechanical watches for starting me down this road, combined with a podcast or two that has enlightened me to this world. One similarity that I find between the two worlds is that there are watches that are super complex, made of carbon fiber and thousands of little parts that cost a fortune, that coexist in the same world as the vintage inspired watches that cost, shall we say, a more reasonable sum of money.


Now one can say, watches? Who needs one? Smart phones can act as a time piece that also can keep all your appointments organized and your schedule running along. I grew up prior to smart phones, and I always have a watch on me. Igor and Clint, younger then me, are also watch wearers. Both have automatic watches - one that relies on the action of your wrist to keep a spring moving inside the watch that keeps the second hand moving. The result is no battery required. To me, this is the watch equivalent to the mid 80's Trek and Miyata touring bikes. A solid mechanism, that, given a little bit of love and care every few years, will see you through just about anything.


Quartz watches (the ones with a little battery) were supposed to kill off automatic watches. Yet, shows like Baselworld show that the desire for automatic watches/mechanical watches still exists. The rise of carbon bikes and 11 speed index shifting should have meant that steel bikes and non aero levers should have disappeared and yet year after year at NABHS, Bespoke in the UK, the Philly Bike Expo, and the New England Builders Ball, more small steel frame builders rise up to take up the torch of a steel frame builder.

So who still wears a watch and do you wear it while cycling your steel bike?

Spring Rustines Delivery

$
0
0
By Scott


While this past winter has not been as snowy or cold as last year, the coming weekend shows that Spring is arriving. We'll have high tempertures in the 60's to low 70's in some places around the Mid Atlantic. Another sign of Spring arriving is that our latest Rustines order arrived. The Campy gum hoods and the gum constructeur grips are here, as are the constructeur grips in black. The small Rustines patch kits in the metal tin are back as well, so time to restock your saddle bag with a new patch kit for spring time riding.


We also brought in the Mafac half hoods in white to brighten things up for Spring.


Igor and Clint are still over in Taiwan. The Taiwan Bike Show is now done, so next week they meet with our suppliers and collaborators there about existing projects as well as new ones. Keep any new product ideas coming to ideas@velo-orange.com 
You can follow their continued adventures through VO's instragram.

What are people's plans for this coming weekend?


Proper Patch Preparation

$
0
0
By Scott

With spring now having arrived, it's time to make sure everything is prepped for a day out on the bike. Judging by the number of cable kits that get sold in January and February, I'd say that the first two months of the year are when folks redo the cables as the ground work for the cycling season. March and April seems to be the time that folks put on new tires and tubes.

Like most folks, I have a bag on my bike that I keep a collection of parts and tools in. One thing that I always keep on hand is a patch kit. I do have a spare tube with me, but I keep a patch kit on hand just in case.
In testing out the Rustines patch kits, this is what we found to be the best instructions for them:
  • Sand the entire area which the patch will adhere to
  • Put a thin layer of glue down, spread around the entire patch diameter
  • Wait for 6 minutes to let the glue dry. This will depend on the amount of glue used.
  • Put the patch on
  • Hold with finger and thumb for 2 minutes.
  • Re-install
  • Inflate
  • Ride bike
It's always handy to double check your cycling bag before the start of the season. Check that you have a spare tube (and that it seems to be in good shape) and you haven't lost the patches or glue from your repair kit. I also toss an extra zip tie or two and any roll's of electrical tape that are down to the end. 

Do you have any tips on things you keep as extras in your cycling bag?

Wheel Talk, No Lies

$
0
0
Here at Velo Orange International, we strive to offer the best balance between performance, functionality, and aesthetics. By borrowing designs from motorsports documentaries such as The Fast and The Furious (1-7), Redline, and Gone in 60 Seconds, we have developed a product which saves a whopping 0.314 seconds over 40km. As with any component upgrade, this just might solidify your place in Strava history.
Actual testing footage
In addition to the existing rotating mass from a traditional wheel, there is rotational mass being supplemented by the integrated cap or "Spinner" which keeps spinning in the direction of the wheel's rotation. This forward momentum allows for increased carried momentum, optimal wattage transfer, and it even yields a higher interface success rate. Basically, due to conserved angular momentum, this revolutionary wheelset carries you up hills with reduced fatigue.

The details:
  • 650b. Because French.
  • High flanges
  • Through-axle compatible
  • Uni-directional
  • Tubeless compatible
  • Polished silver finish
  • Ceramic bearings
  • Double butted construction
The first production run will only be available for all-road bikes, but keep your eyes peeled for no-road and some-road compatibility in 2018.

Product inspiration. They just keep spinning.

Reflections on Riding in Taiwan

$
0
0
by Igor

The riding through Taipei, Taiwan is like nowhere else I have ever experienced. Traffic goes by and around at speeds which should make you feel uncomfortable, but it is all a delicate choreography of swooping, merging, filtering, and acceleration that is acted out on the stage by bicycles, scooters, and cars. Amazingly, all of this happens with virtually no horn honking.


The most important part is to fit in by being confident, and that means breaking some rules that are often considered commonplace. At a redlight, going around traffic to filter towards the front is perfectly normal. Quickly navigating around double-parked cars is expected and safe. Everyone on the road, regardless of what you're driving or riding, is treated equally and without prejudice.

A post shared by Clint Boyer (@clinsstagram) on

Nestled amongst all of the surface streets, there are a ton of parks and greenspaces as nice respites from daily traffic and the general hustle and bustle of city life in Taipei. In addition, the riverside parks following the Tamsui and Keelung Rivers allow riders to traverse the outer edges of the city completely off the street. Though the route is flat, crosswinds and headwinds abound in these long, bike-centric highways.


After a day at the show, we decided to get further out of the city and give our climbing legs a bit of a workout. Climbing through mountainous roads, we were awarded some breathtaking views and descents. I really enjoyed getting in the drops, snaking around corners, and overtaking those scooters that had left me in their dust in the valley below.


Towards the end of the ride, we made it to one of my favorite shops, Sense 30. The guys here have made the shop a real destination for bike nerds coming from all over the world. In addition to custom, in-house framebuilding, they specialize in hard to find parts and accessories, built-to-order luggage, lifestyle apparel, and even have a museum of French, English, Italian, and American components. Also, locally roasted coffee to get you nice and jazzed.


We'll be posting more info regarding show sightings, factory visits, and other product updates soon. Keep your eyes peeled. 

Garage Sale - Save the Date

$
0
0
By Scott

Again this year, we're going to have a garage sale to clean out samples, mismatched items, overstock products, and returns stacking up in our warehouse.  The date we've picked is Saturday, April 29th. It will be from 9am to noon.

We'll have prototypes for sale, stuff that was put onto show/demo bikes, samples from our suppliers, and scratched parts. We'll probably even have a frame or two for sale. For those of you coming, you can also purchase any non garage sale items for 20% off retail (items on sale excluded).

We'll have our usual supply of donuts and coffee on hand to fuel your shopping. The sale is at our showroom at 1981 Moreland Parkway, Building 3, Annapolis, MD 21401 (it's way down to the right as you come into the industrial park).

Feel free to RSVP on Facebook so we know how many donuts to get! 

Fine print/T&C's:
  • Nothing can be preordered
  • No returns on garage sale items
  • Cash or credit card only
So save the date and we'll see you there!

Foraging Into Spring

$
0
0
By Scott

A sign of spring's arrival is the sudden sprouting of mushrooms in a lot of places. We've brought back the Opinel Mushroom knife for this special time of year. It has a curved blade to allow for careful removal of the fungus from its forest home and the boar brush on the end allows for careful cleaning of the mushroom without doing damage to its outer skin. Known as a couteau a champigon in France, we only keep these in stock for mushroom season, so once they are sold out, more won't arrive for a while.

We also have expanded our range of Opinel knives to include a kitchen knife. It is a great all purpose knife with a Japanese style (Santoku) stainless steel blade. The design of the blade is such that there is less rocking required to slice something. This makes slicing veggies much easier IMHO. It uses the same wooden handle as the essential kit of knives makes it easy to grip and keep clean. It also has a continuous cutting edge that makes it easy to sharpen, and keeping a knife sharp is a real key to how well it performs.


The Swift Camp Out is scheduled for this year again. June 24th is the date that we're all going to try and get out for the night via a bike. Whether you ride 10 miles from home to camp or 100, it's a great goal to work towards. Now's the time to start putting your touring kit together and doing some practice runs to make sure it all fits and doesn't sound like a tuk tuk going through Jakarta at rush hour.


In addition to the Camp Out, what's everyone planning for their spring and summer bicycle tours?

Bike Build Ideas: Urban Day-Tripper

$
0
0
by Igor

Road bikes converted to flat bars are gaining a lot of popularity in urban environments. The combination of an upright position and ease of control makes this type of build a great option for those riders who mainly ride in the city and want to be a bit more comfortable on group rides.

This Pass Hunter Disc setup is our interpretation of an urban day-tripper to conquer any road condition that may crop up. We laced up some 650b wheels to be the basis of our build. By using the smaller wheelsize, we could increase the cushion of air the bike rides on. We selected the WTB 47mm Horizon tires, which end up being about the same circumference of a narrow-tired 700c wheel. Cobbles and potholes are vanquished, and hopping on and off curbs poses no threat.


The Postino handlebar is a great bar for converting drop bar road bikes to flat bars or just as an all-around city bar. It's the goldilocks bar for city rides - not too wide, not too narrow.


We opted to go with a wide range gearing because Annapolis and the surrounding area does have some hills. Our 50.4bcd 46/30t up front and 11-36t in the rear - enough to climb a tree.


Clint scrounged up some super clean Campagnolo downtube shifters which we mated to our shifter mounts to make the dangler and pusher move around.


The 7700-series Dura-Ace derailleur was never designed to work with a 36t cassette, so we used a Wolftooth Roadlink to extend the range of the cage. Shifting is fine, but not quite as fast as pairing the same derailleur with a 11-28t cassette. Then again, you're not shifting all that much around town, anyway.


You may have seen this constructeur-style stem that we were thinking about re-making on a previous blog post. After a couple samples, it ended up being far too heavy and expensive. But it looks really cool.


I'm thinking of making the "Bike Build Ideas" a more regular addition to our blog. We have several demo, sample, and show frames around that we look forward to building and re-building to give our readers some ideas for their own projects.

Complete build list:

Cross Buns and Cross Chaining

$
0
0
By Scott


When I started riding, one of the "rules" of cycling that was passed down from more experienced cyclists was never to have the chain in big and big or small and small. This meant you did not want the chain aligned with the largest cog in the back and the largest ring in the front  or the smallest size cog in the back and the small ring in the front.

(big and big)

There are certainly some good reasons not to do this:
  • This combination puts more strain on the chain. Chains run best when they are as straight as possible.
  • It also puts more stress/wear on the chain rings and cassette.
  • Some rear derailleurs can't handle the range of the cog and the front chain ring, and if the chain is short, putting it in big and big could do damage to the rear derailleur
  • When using small and small with a compact double, the chain can strike/rub against the large ring due to the angle that the chain is at as well as the size difference between the small and large ring.
  • It can make a hideous noise due to the chain being at an extreme angle
So instead of being in big and big, you should be in a small and mid range cog. The big and big gear combination (46T x 28T) works out to a gear inch of 42.7 inches. If I use the inner ring and a middle cog (30T x 18T), I get a gear inch of 43.3 and a much straighter chain line.

(small and mid- better chain line)
    Now while chains have certainly become stronger over the years, some things have stayed the same. More folks seem to use the larger cogs while being in the big ring. This might be a reaction to the increasing popularity of 1 X systems. Just make sure your chain is long enough and most drive trains can handle it for a short period of time.

    (small and small)

    Small and small is still something we don't recommend. The chain can get caught on the pins on the inside of the large chain ring (they are there to help shifting on 10 speed set ups, due to the narrowness of those chains). Typically the gear ratio that is the small and small is replicated by using the large ring and a middle cog in the back, similar to our earlier example of big and big.

    If you want to learn about gear inches/ratios the late Sheldon Brown's site has the best set up for figuring out the gear ratios on your bike. You can find it here.

    Owing that it is Good Friday, our resident baker Clint, took it upon himself to bake some hot cross buns. We'll be enjoying these today at the office with a coffee or tea.

    Recipe can be found here


    Cigne Stems are Back in Stock

    $
    0
    0
    By Igor


    We just got an air shipment of Cigne Stems. You all have been wonderfully patient waiting for them. Find links to each of the styles below:
    In addition to the Cigne Stems, we got in more cranksets and rings:
    Quick note, the adaptors for 1" threaded headsets are on order and are expected to arrive early-June.

    Have a great weekend!
    Viewing all 677 articles
    Browse latest View live


    <script src="https://jsc.adskeeper.com/r/s/rssing.com.1596347.js" async> </script>